Restaurant play area ideas are planning concepts that begin with a measured site, a clear supervision model, and constraints that must be resolved before colors or equipment are discussed.
Whether restaurant owners call the designated play area an indoor playground, a soft play corner, a play cafe feature, or simply indoor play, the practical sequence is the same: define the users and operating model, mark the non-negotiable routes, select a format by constraint, integrate accessibility, route each system to the right safety standards, and close the project with document and site checks. That structure keeps the guide focused on a buildable, family-friendly plan instead of sorting ideas by restaurant type.
Quick answer
Start with a one-page operator brief and a scaled base plan. If the concept cannot show the equipment envelope, accessible route, caregiver intervention path, service circulation, egress, maintenance access, and approval responsibilities, it is not ready for a quote.
1. Turn an Idea into a One-Page Operator Brief Before Choosing a Format
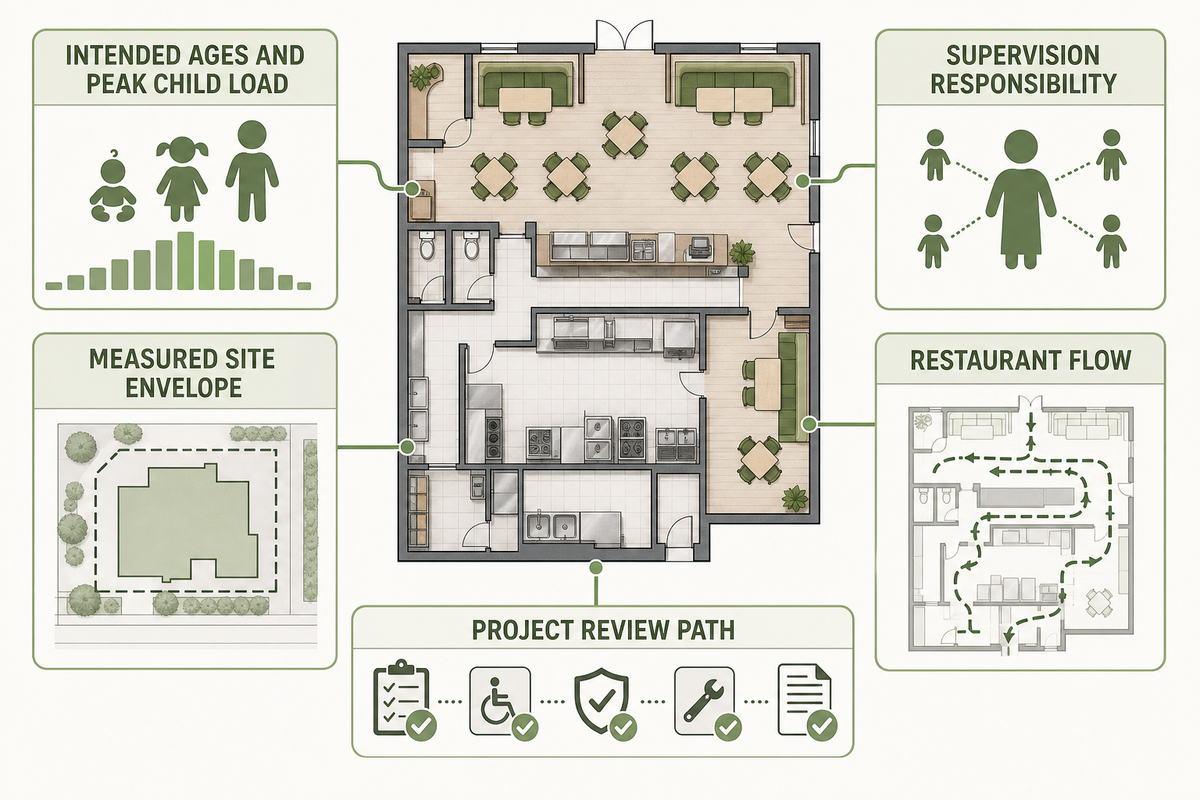
A restaurant play concept is ready for design only when its users, site limits, supervision responsibility, operating conflicts, and approval path are written down. This Red-Line Site Brief should fit on one page and reject unbuildable ideas before they consume design and quotation time.
Small restaurant play area ideas become workable only when they start with a current, measured plan rather than a marketing floor plan. Mark fixed walls, columns, doors, clear height, floor transitions, utilities, accessible circulation, required egress, host queues, server routes, and delivery or installation access.
Brief field
Evidence to attach
Decision it controls
Intended ages and peak child load
Operating estimate and supplier age range
Activity level, zoning, and component review
Measured site envelope
Scaled plan, clear heights, photos, and fixed services
Which play formats remain feasible
Supervision responsibility
Named caregiver or staff role by operating period
Sightline, seating, entry control, and intervention path
Restaurant flow
Meal-period route walk and congestion notes
Separation from service, queues, doors, and egress
Project review path
Design-team and authority questions
Building, fire, accessibility, and local approvals
Only then choose among at-table activities, wall-based play, a compact contained corner, or a larger restaurant playground in an indoor or outdoor zone. Treat colors and theming as downstream choices. The CPSC playground-planning handbook makes site selection, layout, age separation, supervision, and accessibility explicit planning inputs. A small footprint may favor low-intensity wall play, while a larger room can still fail if its only position blocks an exit route or leaves no workable caregiver access.
A well-designed play space does not need to entertain every age with every format. It may incorporate interactive wall panels for imaginative exploration, a toddler zone, or more active play equipment only when the measured site, intended age range, and supervision model support them. That constraint-first test can make a restaurant more kid-friendly without inviting avoidable hazards.
Important boundary: the brief isn’t a code review. It records the questions that the architect, accessibility specialist, fire-protection team, building official, and other responsible parties must resolve under the governing rules.
2. Pass the 3-Ring Layout Framework
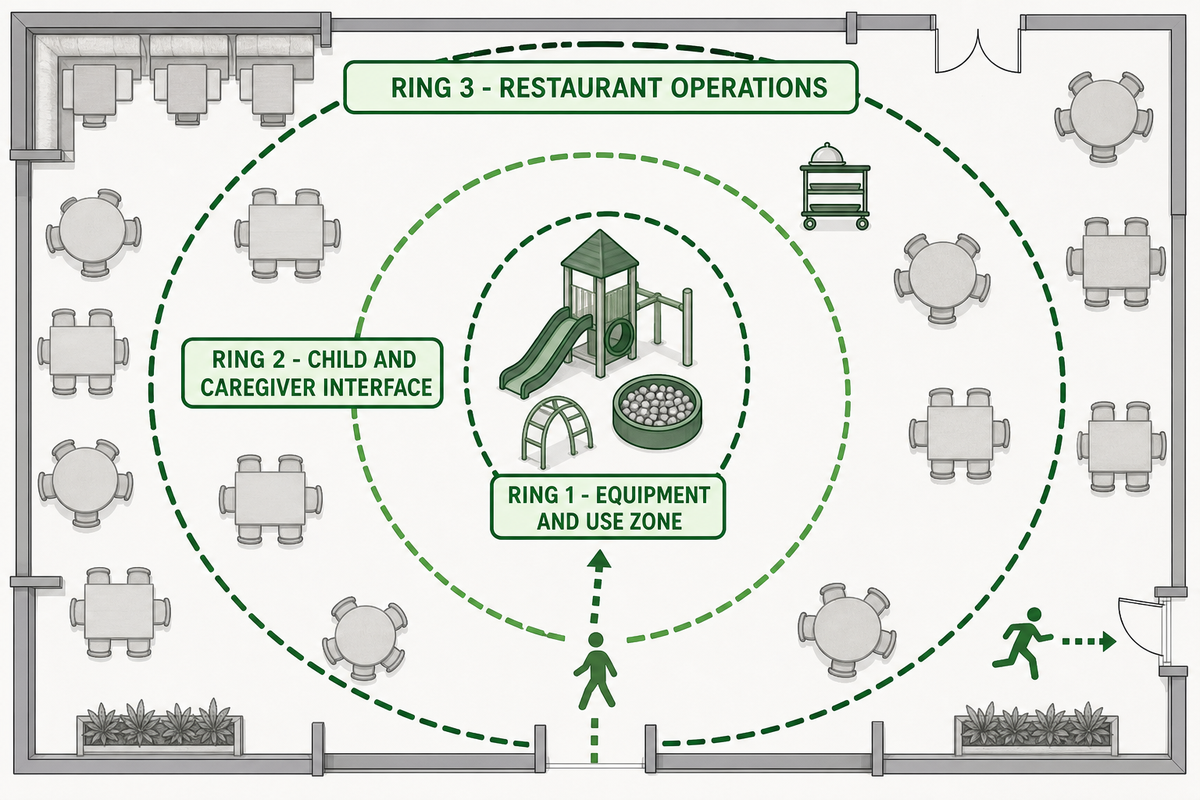
Dreamland’s Three-Ring Layout Test reveals conflicts that disappear when a designer looks only at the equipment footprint. Using the site brief as its boundary, draw three connected rings around the proposed play area, then test them during the busiest realistic meal period rather than on an empty plan.
Ring 1, equipment and use zone. Show the full installed envelope, designated use zones, entry and exit points, active destinations, slide discharges, and surfacing boundary.
Ring 2, child and caregiver interface. Show waiting, shoe or belongings management if relevant, accessible maneuvering, caregiver approach, and the route to a child who needs help.
Ring 3, restaurant operations. Show dining seats, host and payment queues, server circulation, exterior doors, required egress, and emergency access.
Operator test: Treat a contained play area as part of the restaurant circulation plan, not as an isolated box. Visibility is a layout input; supervision still needs a named owner and a practical intervention path.
CPSC’s current handbook advises organizing the play area into sections to reduce injuries from conflicting activities and separating active physical play from quieter activities. In a restaurant, that means more than separating two play activities. It also means avoiding a layout where a slide exit meets a server route or where the play entrance opens into a host queue.
Test sightlines from several likely caregiver seats, not just the closest table. Record what a seated adult can see after furniture, partitions, people, menu boards, netting, and play components are in place.
Keeping children busy is not the only objective. A workable layout must define where kids play, how caregivers intervene, and how restaurant traffic stays separated.
Visibility isn’t supervision
Name who’s responsible, then walk that person’s intervention path. A child may be visible across the room but difficult to reach quickly because the route crosses service traffic, a queue, a gate, or tightly spaced furniture.
A layout can support supervision, but it can’t manufacture an operating responsibility that nobody owns. Use the Play Area Zone Mix Planner to compare the activity mix, then put the preferred option back onto the restaurant plan and rerun all three rings.
3. Size Age Zones and Capacity Before Selecting Components
Indoor restaurant play area ideas cannot be sized from a universal allowance. A useful play space and capacity decision combines the intended age groups, supplier-rated users, equipment use zones, accessible routes, child entry, caregiver access, and restaurant operating clearance.
Start by separating intended ages and activity intensities. CPSC planning guidance distinguishes equipment intended for children 6 months through 23 months, 2 years through 5 years, and 5 years through 12 years. Map toddlers, preschoolers, and older children to the equipment’s stated age range rather than relying on restaurant labels. Those bands are design inputs, not a universal restaurant admission policy; the selected equipment and project documents still control the intended-user decision.
Slow sensory panels, toddler zone crawl elements, and fast slide discharges create different conflicts even when their nominal footprints look similar.
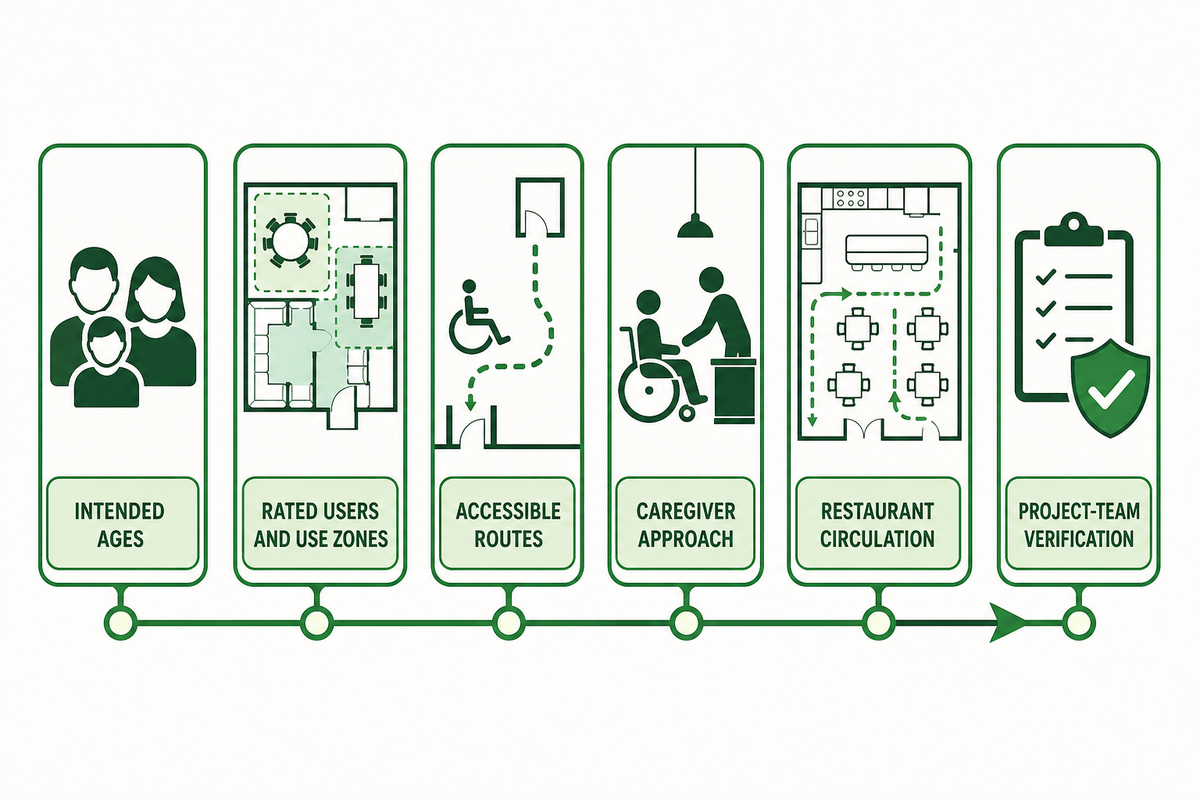
Use this capacity sequence
Define intended ages and incompatible activities.
Obtain the supplier’s rated users and complete use-zone drawing.
Add accessible routes, entries, turning and component access.
Add space to accommodate caregiver approach, waiting, and intervention.
Protect restaurant circulation, egress, and service operations.
Have the qualified project team verify the resulting plan.
Area is still relevant; it simply isn’t a standalone answer. The U.S. Access Board guide describes a ground-level accessible route with a minimum clear width of 60 inches (1525 mm). It allows the route to narrow to 36 inches (915 mm) for a distance of 60 inches (1525 mm) under its stated conditions.
Where the ADA play-area provisions apply, the guide permits a 44-inch (1120 mm) clear route for play areas smaller than 1,000 square feet (93 m²). It also identifies 80 inches (2030 mm) of vertical clearance along the 60-inch route. These are accessibility inputs, not permission to size a restaurant zone by one ratio or ignore other applicable requirements.
4. Design Accessible Participation from the First Sketch
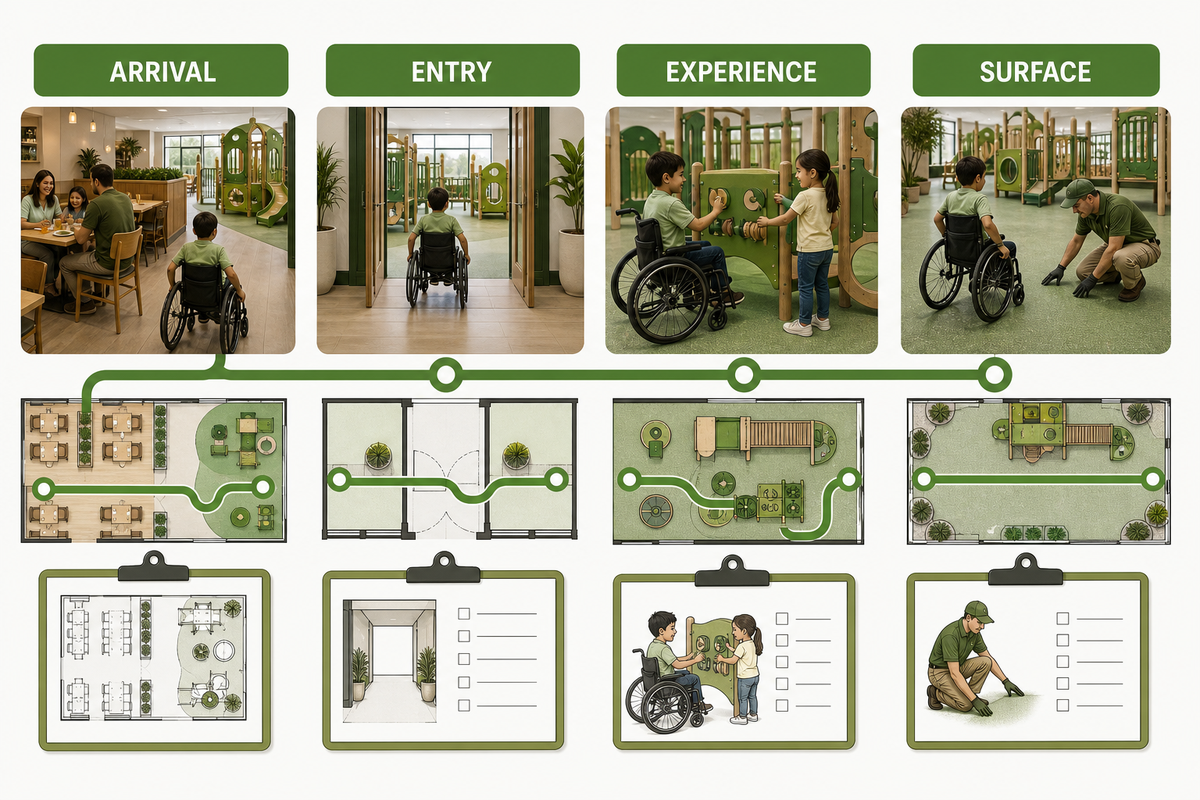
Accessible design isn’t finished when a person can reach the play-area gate. Ask whether the restaurant route, play entry, ground-level experiences, elevated experiences where applicable, and social placement work together.
Resolve accessibility while the component schedule is still flexible. U.S. Access Board guidance ties obligations to the types and counts of ground-level and elevated play components. At least 50% of elevated components must be on an accessible route; where 20 or more elevated components are provided, ramps must connect at least 25%, while other required elevated components may use ramps or a transfer system.
Review layer
Question to answer on the drawing
Common weak answer
Arrival
Does the restaurant’s accessible circulation reach the play entry?
“The dining room is accessible.”
Entry
Can the intended user approach, enter, and maneuver at the play system?
“There is a wide gate.”
Experience
Which component types and counts are accessible, and how are they integrated?
“One accessible panel is in the corner.”
Surface
Will the accessible route remain usable through installation and maintenance?
“The material is advertised as accessible.”
Component details also affect the drawing. For transfer platforms, the guide describes a top surface 11 inches (280 mm) to 18 inches (455 mm) high, at least 24 inches (610 mm) wide, and at least 14 inches (355 mm) deep. Its clear floor or ground space is at least 30 inches (760 mm) by 48 inches (1220 mm).
For accessible play tables, the same guidance lists knee clearance of at least 24 inches (610 mm) high, 30 inches (760 mm) wide, and 17 inches (430 mm) deep. A table primarily for children under 5 years may use the parallel-approach provision when the rim is no higher than 31 inches (785 mm). Copy these source-defined values into the project review only when the associated component and provision apply.
Don’t isolate every accessible component in a separate “special” zone. The Access Board discusses integration because placement affects whether children can participate near the same activity cluster. For a soft-contained system, also verify the accessible entry points and route details that apply to that system.
These are minimum design inputs, not a do-it-yourself legal determination. Confirm the governing accessibility requirements, site conditions, component schedule, and final details with qualified professionals and the authority having jurisdiction.
5. Match the Safety Standard to the Play System
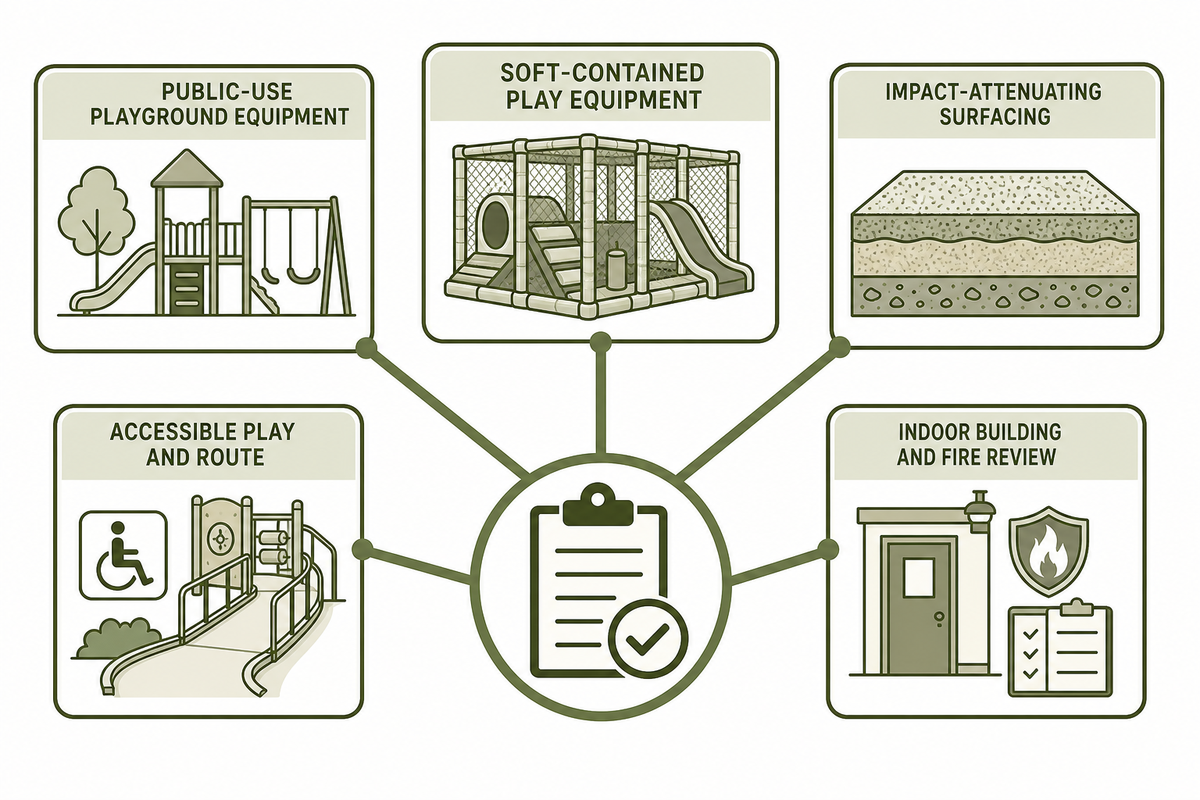
“Playground compliant” isn’t a complete specification. With the accessibility inputs defined, review public-use equipment, soft-contained play, impact-attenuating surfacing, and the indoor building and fire layer as separate questions, so the RFQ names the proposed system and the evidence requested.
Scope
Current reference to verify
Buyer evidence question
Public-use playground equipment
ASTM F1487-25
What age range, use zones, installation instructions, and conformity evidence apply to this exact configuration?
Soft-contained play equipment
ASTM F1918-21
Which soft-contained-system requirements and operating documents apply?
Impact-attenuating surfacing
ASTM F1292-22 for laboratory critical-height evidence; ASTM F3313 for installed-field testing
What critical fall height, use-zone coverage, installation, and installed-field evidence are required?
Accessible play and route
U.S. Access Board guidance and governing requirements
How do route, component counts, component types, placement, entries, and surfaces work together?
Indoor building and fire review
Governing locally adopted code; ICC Section 424 is a model-code reference
Which material, fire-protection, separation, egress, area, and approval provisions govern this site?
ASTM’s scope page for F1487-25 expressly excludes soft-contained play equipment, which is why applying one label to every indoor structure is risky. Treating the labels as interchangeable creates a specification hazard. Likewise, a surfacing material name does not prove that the installed system matches the relevant use zone and fall-height conditions.
Indoor structures add another layer. Current International Building Code model provisions for children’s play structures address materials, fire protection, separation, and area controls. Local adoption and amendments vary, so the architect and fire-protection team must confirm the governing edition and secure the required approvals rather than copying a model-code number into a generic brief.
Ask the supplier for the standard and edition used, configuration-specific drawings, age range, use zones, surfacing basis, material records, installation instructions, inspection and maintenance documents, and a process for notices or recalls. The Safety Surfacing Area Estimator can help frame an early scope, but it doesn’t replace the final equipment and surfacing documentation.
6. Specify Materials for Inspection and Maintenance Access
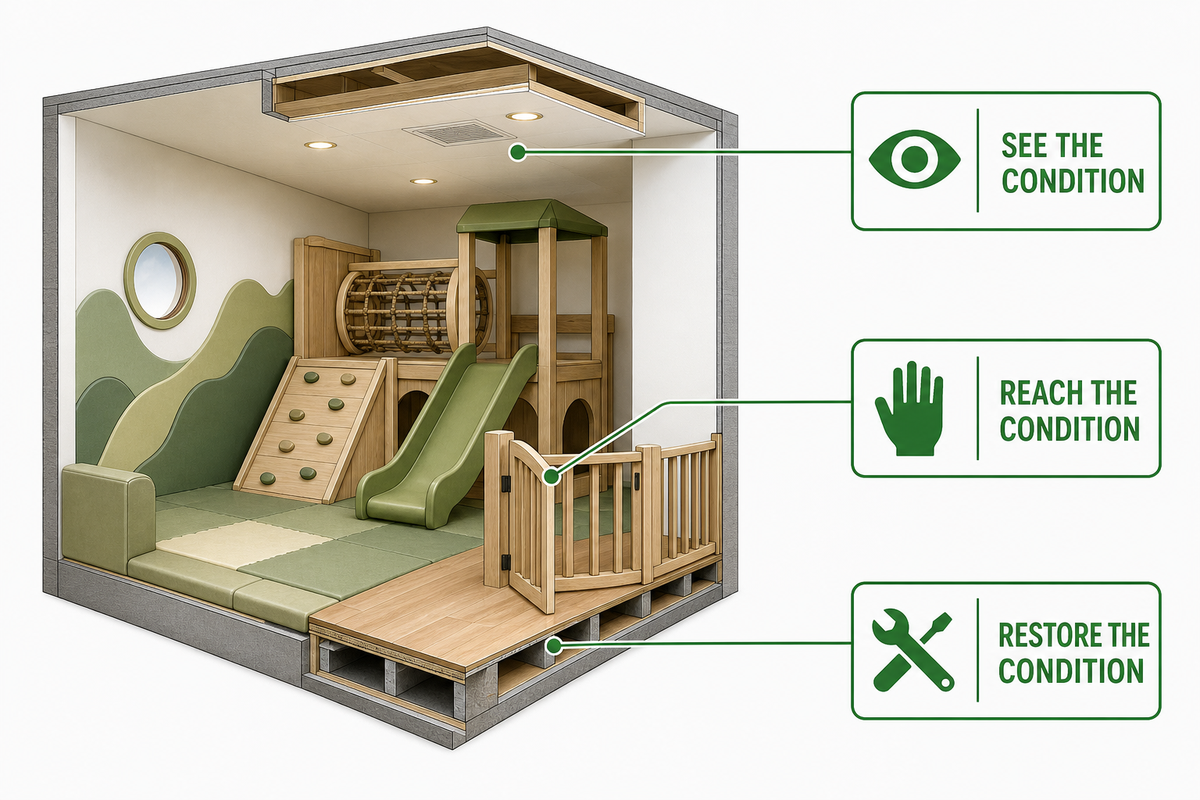
High-quality materials can look durable in a rendering and still be difficult to inspect, repair, or replace. Review maintenance access on the drawing before the visual palette is approved, especially around enclosed zones, seams, floor transitions, barriers, and high-wear contact points.
See the condition
Can staff see netting, seams, fasteners, floor edges, padding, barriers, and concealed wear points without dismantling unrelated parts?
Reach the condition
Can the responsible person safely access enclosed areas, retrieve debris, inspect interfaces, and reach serviceable parts?
Restore the condition
Are wear parts replaceable, finishes documented, spare parts identified, and repair boundaries clear?
The CPSC soft-contained-play checklist highlights visible conditions such as tears and frays in netting, ropes, webbing, and surfacing, as well as clear walkways and collision points. Those checks are easier when the design makes condition and access obvious.
Request a component-specific inspection and maintenance package rather than accepting a generic frequency copied from another site. Use, materials, environment, restaurant hours, and manufacturer instructions affect the plan, and every task needs an owner and record location. A maintainable design strengthens the handover because staff can see what to inspect and where to document it.
Topic boundary: this is design for maintainability, not a cleaning SOP. Cleanliness goals, cleaning frequencies, illness response, spill response, chemicals, and daily hygiene records belong in a dedicated restaurant play-area hygiene guide.
7. Build the Budget and RFQ Around Scope, Not a Headline Price
Two restaurant play-area quotes are comparable only when they include the same boundaries, assumptions, and evidence. A lower headline number may simply omit surfacing, freight, site preparation, permits, installation, inspection, staff handoff, or spare parts.
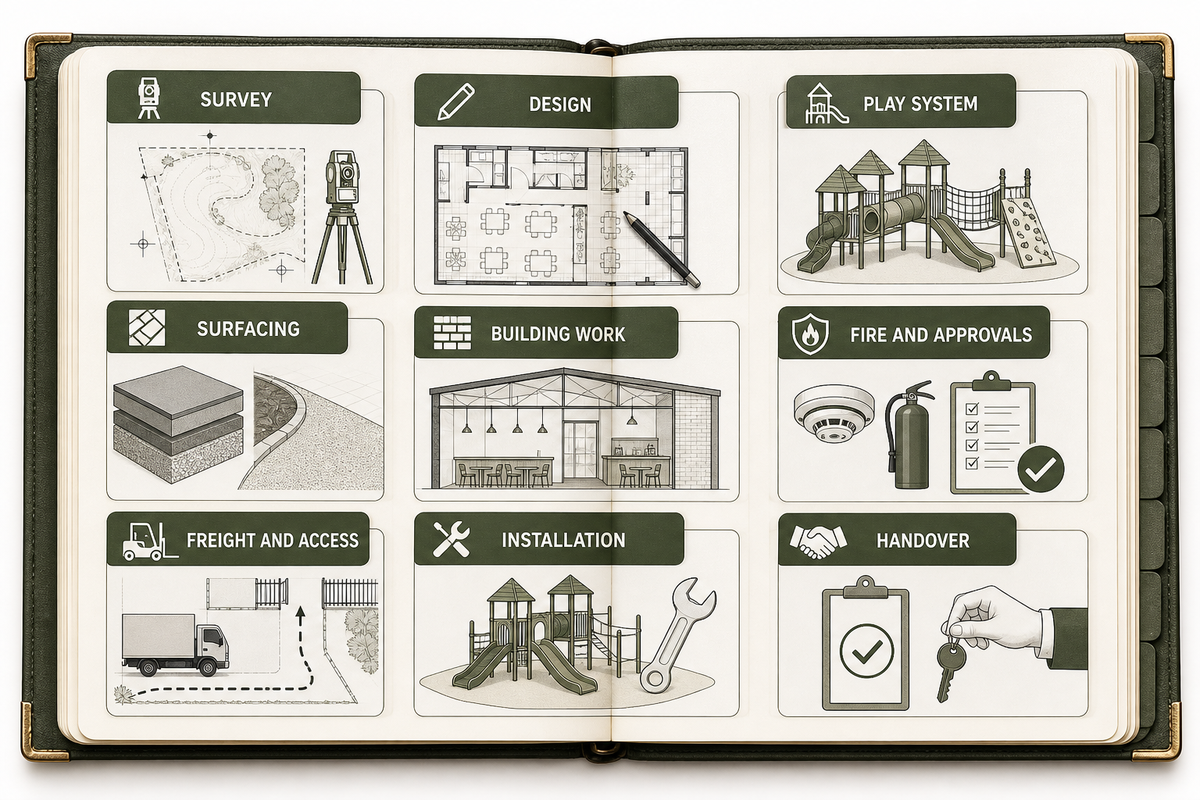
Build the budget as a scope ledger. Keep unpriced items visible instead of hiding them in “by others,” and assign each item to the restaurant, landlord, designer, supplier, installer, inspector, or another responsible party.
Scope category
RFQ fields
Comparison question
Survey
Measured plan, photos, clear heights, existing services
Who verifies existing conditions?
Design
Layouts, coordination, revisions, approval support
How many review cycles are included?
Play system
Components, finishes, barriers, entries, signs
Does the quote match the reviewed configuration?
Surfacing
Base preparation, use-zone coverage, edges, installation
Give every bidder the same measured plan, clear height, photos, intended ages, target capacity, preferred format, accessibility brief, applicable-standard questions, material expectations, delivery access, installation boundary, and handover list. Require assumptions and exclusions in a standard response table.
Don’t force an early budget into a false fixed price. Use “confirmed,” “allowance,” “excluded,” and “unknown” fields, then compare like with like. Current, auditable quotations are needed before publishing price bands; this guide intentionally supplies no universal equipment or installation price.
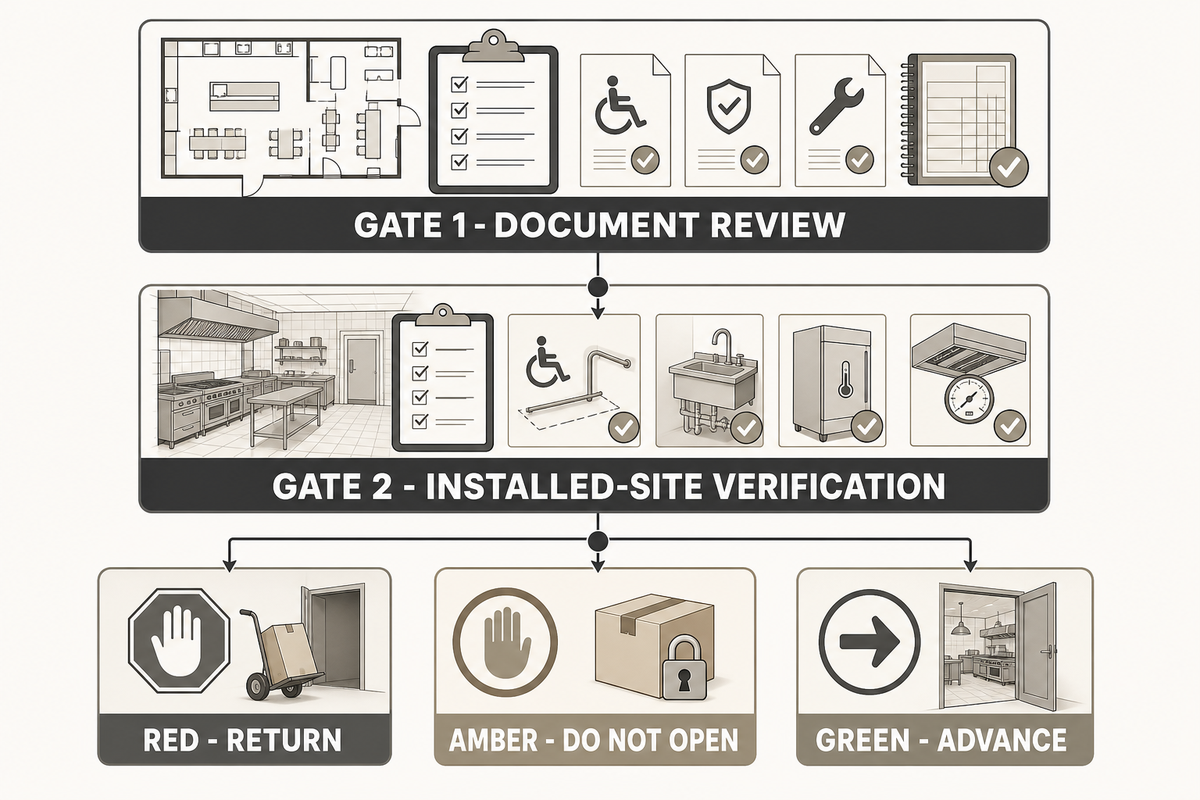
8. Use a Two-Gate Acceptance Ladder Before Opening
A restaurant should not open a play area because the installation looks finished. The RFQ scope fields now feed the Do-Not-Open-Until Checklist, which uses one document gate and one site gate, with an owner and closure evidence for every line.
Gate 1: document review
Confirm the approved configuration drawings, applicable standard or test records, material list, surfacing basis, installation instructions, inspection and maintenance manuals, warranties, spare-parts list, and responsibility matrix. Record the qualified project team’s accessibility, building, fire-protection, egress, and local-approval closeout as applicable.
Gate 2: installed-site verification
Verify installed dimensions, component configuration, entries, routes, use zones, surfacing, fasteners, barriers, signs, visibility, caregiver intervention path, service circulation, housekeeping, and unresolved punch-list items. The reviewer must compare the real installation with the accepted documents rather than inspecting it as an isolated object.
Status
Meaning
Permitted next step
Red
A life-safety, site, responsibility, or approval input is unknown.
Return to survey, design, or responsible reviewer.
Amber
The concept is usable for budget discussion, but one or more operational or documentary inputs remain provisional.
Do not treat the budget concept as an opening-ready design.
Green
The required owner and evidence are recorded for the defined gate.
Advance only to the next named gate.
Finish with staff and caregiver-facing handoff. Explain the intended ages, entry rules, supervision responsibility, escalation route, visible defects that require closure, and where the operating documents live.
The Play Zone Handover Checklist can help structure closeout fields. Adapt it to the restaurant project, the accepted supplier documents, and the governing local requirements.
What a buildable idea looks like
It is not the most elaborate concept. It is the option that fits the measured site, protects restaurant operations, supports the assigned supervision model, integrates accessible participation, follows the right review path, can be maintained, produces comparable bids, and closes both acceptance gates.
Use Dreamland Playground’s Play Area Zone Mix Planner to organize the activity mix, then return the preferred option to the measured restaurant plan for another three-ring review.
Frequently Asked Questions
How much space does a restaurant play area need?
No universal minimum applies to every concept. Size the zone from intended ages, rated users, complete use zones, accessible routes, caregiver access, and restaurant circulation. Ask for the full installed envelope, then have the qualified project team verify it on the measured plan.
Can a play area be retrofitted into an existing restaurant?
A retrofit may be feasible, but it should begin with constraints rather than products. Confirm structure, clear height, egress, accessible circulation, fire protection, utilities, floor build-up, visibility, noise transfer, delivery access, and the effect on operating areas. Document who resolves every unknown. If a life-safety or site input is missing, keep the concept provisional; a wall activity or compact corner may remain feasible where a larger contained structure doesn’t.
Where should a kids’ play area be placed in a restaurant?
Place it where the assigned caregiver can see and reach a child without crossing server traffic, host queues, exterior doors, or required egress. Test several seats and walk both the intervention path and the busiest restaurant routes during the peak meal period.
What should be included in a restaurant play-area RFQ?
Include the measured plan, clear height, photos, intended ages, target capacity, selected play format, accessibility inputs, standards questions, materials, finishes, delivery access, and installation boundary. Add required drawings, test or conformity records, surfacing evidence, manuals, inspection scope, training, warranties, spares, and closeout responsibilities. Require every bidder to state assumptions, exclusions, allowances, and change triggers in the same response table; otherwise a low price may simply omit site work, freight, surfacing, testing, or handover.
This guide is general planning information, not legal, architectural, engineering, accessibility, fire-protection, inspection, or certification advice. Confirm the governing codes, standards, editions, local amendments, and project responsibilities with qualified professionals and the authority having jurisdiction.
Dreamland Playground publishes practical planning guides for commercial indoor-play projects, including family entertainment centers, shopping malls, hotels, restaurants, churches, and other venue types.
Use these guides to frame the questions that should be resolved before concept selection: venue size, intended age groups, project location, attraction mix, operating priorities, timeline, and delivery constraints. Final recommendations should be based on the real site and applicable local requirements.
Start With The VenueFloor area, clear height, site location, intended audience, and target opening date create the working brief.
Clarify The ScopeConcept, equipment, production, shipping, installation, and operating inputs can vary from one project to another.
PROJECT / VENUE / TIMELINE
Prepare Your Project Brief
Venue TypesFEC · Mall · Hotel · Restaurant · Church
Start WithFloor area · Clear height · Age groups · Country